Handheld Quality Assurance: The Latest Metals Identification Trend
Not only does incorrect material impact metal fabrication and final finish processes that delay job delivery, it can place your shop at risk to premature component failure and potential disaster in mission critical applications. But now there is a new way for shops to effectively identify alloy grade, confirm elemental composition, and further streamline metals verification for greater quality control and assurance.
Posted: February 16, 2017
Determining and selecting the correct materials and components used in the fabrication of metal-based products is crucial to ensuring quality. The relationship between a design engineer’s specified alloy grade/chemistry and the actual material sourced from the buyer can significantly impact a number of factors throughout the manufacturing process and beyond. Incorrect material can result in fabrication issues that affect the ease of machining and final finish processes that could result in delayed deliverables, as well as premature component failure that can lead to disastrous ramifications in mission critical applications. Fabricators who only rely on a supplier’s Mill Test Report (MTR) or Mill Test Certificate (MTC) are at risk.
Verification of alloy grade and composition is an imperative step in streamlining fabrication and ensuring end-product quality and efficacy. However, workplace demands often take precedence, leaving manufacturers with little time to learn about the latest trends in quality assurance and control devices.
LATEST METALS VERIFICATION ADVANCEMENT: HANDHELD LIBS
Handheld X-ray fluorescence (XRF) analyzers have been commonly used to verify incoming materials, identify metals throughout the manufacturing processes and verify finished products. However, the limitations of these older instruments led to the development of the newest generation of handheld metals analyzers: devices which utilize a completely different technique known as Laser Induced Breakdown Spectroscopy (or LIBS). Handheld LIBS offers a new and improved way for shops to effectively identify alloy grade and confirm elemental composition. Fabricators now have the means to further streamline metals verification processes for greater quality control and assurance. Handheld LIBS analyzers, such as the KT-100 Katana for example, are the latest trend in metals verification.
WHAT IS LIBS?
Traditionally a lab-based instrument, LIBS is now available in a miniaturized platform due to recent technological advancements. LIBS works very well for metal analysis because, unlike XRF, it is extremely sensitive for light atomic number elements and matrices. This makes LIBS technology an ideal tool for identifying the most popular aluminum grades 1100, 6061 and 6063, as well as Al and Si brasses and bronzes or Be Coppers. It can do this while still effectively identifying many of the other common metals used in fabrication, including stainless steel, nickel, and titanium alloys.
HOW DOES LIBS WORK?
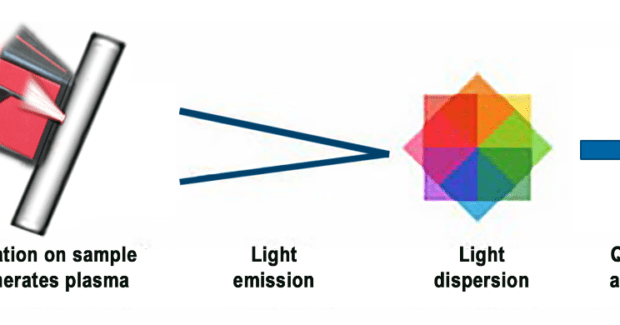
Laser Induced Breakdown Spectroscopy technology uses a beam of focused laser light to excite/ablate a very small area of a material. A small mass of the sample is converted to a plasma plume. As the plasma cools, it emits characteristic light frequencies that are collected by a detector and transmitted to the spectrometer. Each element on the periodic table has a number of unique LIBS’ spectral peaks. These peaks are used to calculate the concentration of elements, such as metal alloy composition (see Figure 1).
https://youtu.be/aFc6iH4C3bM
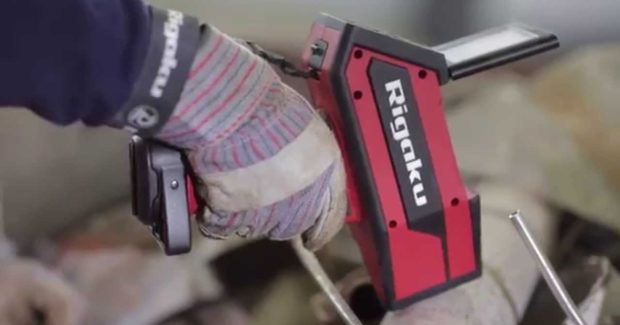
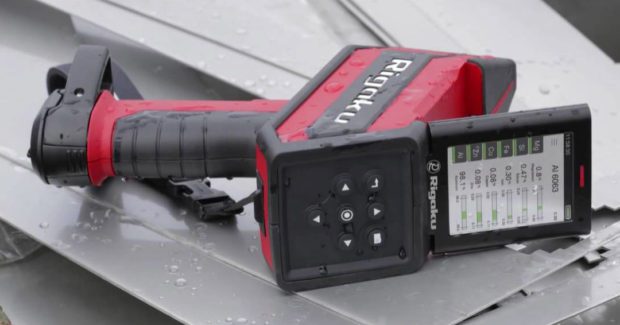
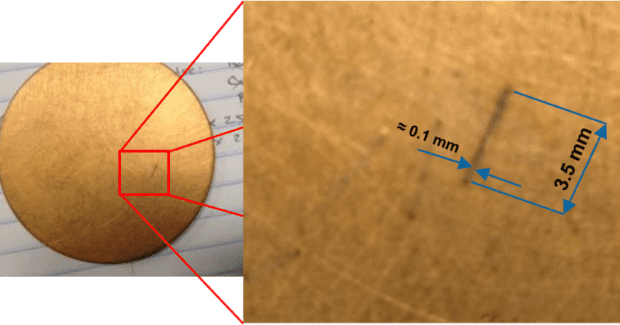
LIBS is a virtually non-destructive surface technique (see Figure 2). A microscopic amount of material is consumed. However, surface contamination included with plasma can impact results and for that reason, it is important to select a handheld LIBS analyzer with surface preparation integrated onboard. The KT-100 handheld LIBS is one unit that incorporates user adjustable surface preparation onboard the analyzer with DrillDown™ technology. With DrillDown, users can select a light, medium or heavy pre-burn depending on the level of surface contamination on the material. Features such as this can save fabricators time and effort while enabling them to obtain the most accurate results.
PRECISION AND REPEATABILITY
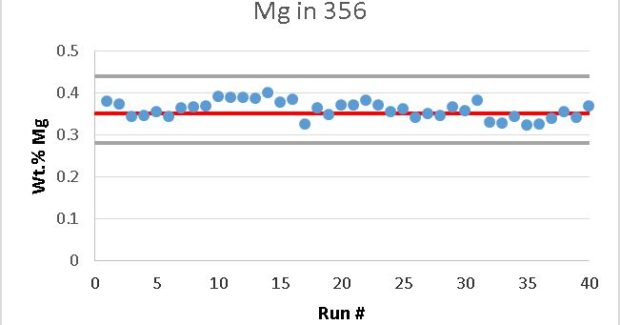
As the demand and need to extend the life-cycle of aluminum and other metals continues to increase globally, precise metals identification has become more significant. Since secondary production now contributes greatly as a source of metals, quality assurance is more important than ever. To demonstrate the precision of Laser Induced Breakdown Spectroscopy in measuring light elements in aluminum alloys, Figure 3 shows magnesium accuracy and repeatability in a cast 356 standard over 40 one-second long tests using a KT-100 handheld LIBS.
MTR AND MTC VERIFICATION PROTECTS BUSINESSES
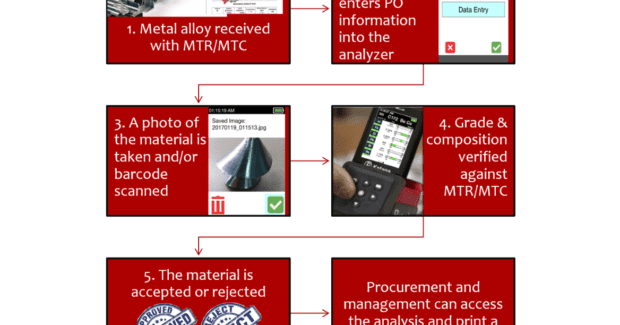
The consequences of out-of-spec materials are well known. Simple and efficient verification and documentation is the best QA/QC measure. New generation devices with onboard features enable users to perform inspections more effectively. New generation devices integrate a macro camera, barcode reader, data entry and WiFi. Usability is extended and creates more streamlined processes that protect your business (see Figure 4).
FAB SHOP REQUIREMENTS: RUGGED, DURABLE, EASY-TO-USE, BUT SUPPORTED
Fragile tools have no place on the shop floor. The expensive repair fees on some metals identification devices can easily exceed $10,000. Service costs and downtime have an immediate and sometimes lasting effect on productivity and profit. For that reason, analyzers such as the KT-100 handheld LIBS are designed for and must pass rigorous testing requirements put forth by US MIL STD 810G (shock, vibration, drops from 3 ft) and IP-54 (dust and moisture protection) standards. Shop owners and managers should demand that the latest technologies they invest in not only be designed to meet the toughest standards, but are actually tested and certified as compliant to rigorous use requirements.
When a new technique is introduced, how can a fabricator best calculate their return on investment to decide whether or not it makes sense to implement a new device? In addition to rapid and accurate results, durability and other features, here are some other important considerations:
- A metals identification device must be easy to use and easy to learn to use.
- The device must be light-weight and ergonomic to prevent user fatigue.
- The device must have a large and easily expandable alloy library.
- Long battery life is very important.
- The vendor must be knowledgeable and provide support for the life of the unit, at no extra charge.
- The unit must be trackable through onboard GPS to protect your investment.
TAKE ADVANTAGE OF THE LATEST METALS IDENTIFICATION TREND
New generation technologies are designed to maximize performance by overcoming analysis and usability gaps to enable on-the-spot analysis of a wider range of metals, including all the common aluminum grades. Handheld LIBS analyzers, such as the KT-100 Katana, are an example of the latest trend in metals identification.

