Diameter Measurement Gage: On-Machine Accuracy and Repeatability
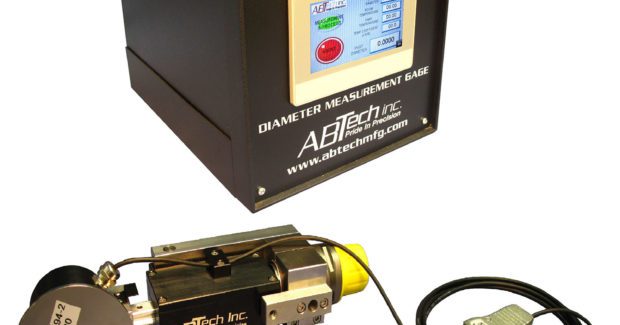
Do you need to check the size of your turned parts while still on a lathe, grinder or other machining center? The Diameter Measurement Gage model DMG360 from ABTech is ideal for precisely measuring the diameter of very large parts with high accuracy using the current machine setup, without removing the part or needing to sweep with a beam gage.
Posted: April 14, 2017
Do you need to check the size of your turned parts while still on a lathe, grinder or other machining center? In Booth 3012, the Diameter Measurement Gage model DMG360 from ABTech Inc. (Swanzey, NH) is designed to precisely measure the diameter of very large parts with better than .001 in (25.4 microns) accuracy using the current machine setup, without removing the part or needing to sweep with a beam gage. Common machine tool receiver mount options are available to use the DMG360 wheel assembly in a variety of machines. It does not have to be dedicated to only one machine in the shop. Adjusters are built into the wheel body to allow easy alignment of the wheel to the part, and a reference guide to apply the proper amount of pressure to preload the measurement wheel.
The precision ground hardened steel wheel provides both accuracy and durability while riding on an uninterrupted OD surface of the part. Using the machining center to rotate the part, the gage calculates the diameter by averaging four full rotations. A proximity sensor and trigger with LED indicator for alignment combine to precisely count off each revolution of the part. A digital touchscreen is built into the portable control box for the operator’s interface and to display the measurement results. Optional handheld IR thermal sensors are available to enter the room temperature as well as the part temperature to use the system’s built in compensation factor. These DMG360 gages were custom engineered for a U.S. manufacturer of large power generators and, after having been thoroughly and successfully tested, are now being offered to the market as a standard product.
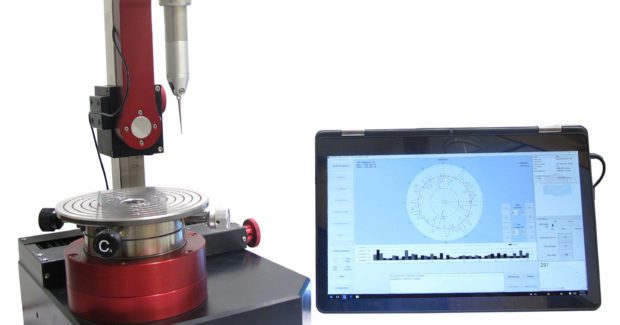
Also on display will be the new model µFG100 MicroForm Roundness gage for parts up to 8 in diameter, 12 in tall and weighing up to 50 lb. With a more compact size, this gage is able to take up less space in any QC labs or shop floor while maintaining the same speed, ease, and confidence in measuring tight geometric tolerances with ultra-precision accuracy and repeatability offered in larger systems. MicroForm gages are ideal for in-process geometry measurement of shafts, bearings, gears, pistons, turbocharger and other precision machined or stamped parts; incoming inspections for vendor compliance; optical lens inspection; manufacturing process control and quality control lab analysis. The most common geometric forms of measurement include runout, roundness, flatness, concentricity (in and out of plane) parallelism and perpendicularity.
An ultra-smooth, maintenance-free rotary air bearing with motor drive provides an ultra-precision reference axis. A responsive lever-type probe with nearly perfect linearity provides an overall system accuracy better than 5 µin (.125 µm). The air bearing is recessed in a machined base providing excellent stability. Extra effort was made to reduce “noise” for confidence in the results being from the part alone. A “real-time” operating system eliminated resource conflicts typical with systems running on PCs. The processor provides high speed data acquisition and tight synchronization of the indicator signal with the angular position of the rotary table for pin-point accuracy.
The MicroForm’s intuitive measurement program features two simple views on a large color touchscreen monitor to deliver results quickly and easily. On-screen “step-by-step” instructions assist the novice operator through each measurement in a way that doesn’t reduce the efficiency of experienced users. Customizable displays and output options are built in to meet particular needs. User selectable scale resolutions and SAE or metric units provide full flexibility for all part requirements. Add the part number and comments to capture all details pertinent to the measurement for display or to print out with the results.
ABTech Inc., 126 Monadnock Highway, PO Box 10296, Swanzey, NH 03446, 603-358-6431, Fax: 603-358-0196, www.abtechmfg.com.


