Plasma Cutting Tips for Small Welding Shops
Light industrial CNC plasma cutting options now make it possible for small home-based businesses and hobbyists to complete amazing jobs that were almost impossible a decade ago. These new plasma cutting systems can provide great performance at even better prices, but make sure they fit your needs before getting started so that you aren’t disappointed.
Posted: December 11, 2017
I was recently asked to fabricate a new outdoor sign for a terrific family-owned business just over the state line from me in Vermont. Founded in 1969, the current wooden sign for this sales and auto body shop had reached the end of its life and the owners were looking for a new 4 ft x 12 ft metal sign to replace it. Although I wanted to help, I was worried about fabricating and moving a sign of that size from my home shop. I knew the 12 ft steel sheets I’d need would weigh close to 250 lb apiece. I also knew I’d need a least two sheets plus more metal for the frame and internal supports as the customer wanted a double-sided backlit sign. In all, I estimated the finished sign would weigh more than 700 lb! The other challenge had to do with the length of my CNC table. Just one-third the length of the sign at 4 ft x 4 ft, I’d have to index and cut the sign in sections, moving the metal along as I went.
SIGNED, SEALED, DELIVERED
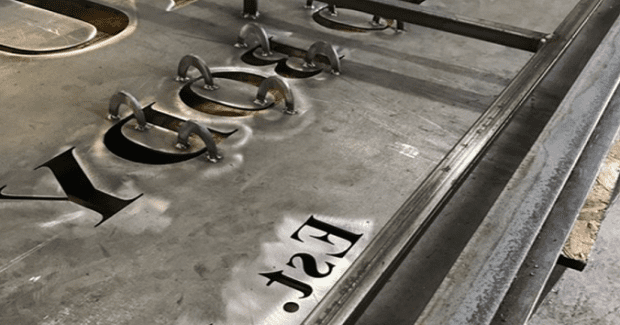
After getting over my initial hesitation, I took the job. I ordered and moved the metal into position on my CNC table with help from my son and my tractor. Next, I cut each sign, modifying the font so that a small amount of metal tabs connected the center part of the letter, for example, the center of the “O” (in “Auto”) to the rest of the sign. After the CNC cutting was complete, I went back and removed the tabs using the handheld plasma torch on my Powermax45 XP. Then I used C-shaped brackets to weld the center part of the letters back to the sign. Once I had all the letters complete, I cut then welded internal framing into place. I included additional framing for a white center panel to help reflect light from the soon to be added LEDs. In addition, heavy duty hinges on the bottom frame were added that allow the sign to open for cleaning or service.
Next, I added a temporary brace to hold the sign open at a roughly 45 deg angle. One side was flat on the table while the opposite side was hinged open. This made it easier to paint the sign and install all 160 of the LEDs. The inside of the sign was painted bright white to reflect even more light and the lights were wired to a weatherproof 12 volt switching power supply. That was followed by the installation of the white center panel into the frame made earlier. The sign was then hoisted off the table and placed between temporary supports while I cut and welded metal panels to close in the top and sides of the sign. The final step on the build was to treat the exterior of the sign. The customer wanted the sign to have a rusted, natural brown patina, so I used a chemical rust enhancer to quicken the process.
Satisfied with the finished product, the sign was loaded onto a flatbed truck and secured for a roughly 13-mile ride west for installation. The new sign brackets lined up perfectly with the existing sign mounts and an electrician was out the next day to connect the power. A job like this would have been close to impossible for me to complete even a decade ago, but greater availability of light industrial CNC options in recent years now make it possible for small home-based businesses and hobbyists to take on jobs similar to this one. When shopping for a light industrial CNC table, you will encounter a lot of choices. Fortunately, those choices are easy to navigate. By keeping a few things in mind, you will be well on the way to choosing the right plasma table for your specific situation.
WHAT EVERY CNC PLASMA TABLE MUST HAVE
Let’s start with what I mean by a “light industrial CNC table.” A small plasma table will range from 2 ft x 2 ft to 5 ft x 10 ft, use an air plasma system (as opposed to high definition plasma) to cut, and a standard office computer as the CNC control. On average, you should expect to spend between $10,000 and $25,000 for one of these tables, though they can be had for slightly less and more than that. The size you choose will obviously depend on how you plan to use your table, but generally tables on the smaller end of this scale are ideal for home hobbyists, craftsmen, and garage fabricators. Small businesses who plan to regularly use their table to produce parts will normally want to choose one on the larger end of this scale. No matter what the size or cost, all CNC plasma tables need the following four components:
- Table and mechanical components that include a gantry, torch carriage, and axis to move the torch. There are numerous manufacturers out there making these types of systems. Best advice: ask to see a cut sample from whichever system you choose.
- CNC and related software to convert your cutting program into instructions that control cutting direction and speed, along with your plasma system, height controller, and peripheral equipment. As mentioned earlier, most systems now use a standard personal computer. When it comes to the software, some brands are easier to use than others, so I recommend a demonstration before buying to make sure you are comfortable with it.
- Fume control consisting of either a downdraft system or water tray. Each of these has pros and cons. Downdraft systems are easier to clean and you don’t have to worry about rust forming or your water freezing. On the down side, the blowers used to collect fumes will suck out all the air (both hot and cold!) in your shop – a real problem for those of us who live in hot and cold climates. In addition, this type of system is more expensive than water if you need a zoned system or filtration devise. Water, on the other hand, is the cheapest, easiest way to trap particulates from the cutting process. It does a very good job. Disadvantages include rust build-up on your cutting bed and machine components, edge roughness if water splashes on the part being cut, more difficulty cleaning, and danger of your water freezing in an unheated shop.
- An air plasma system like the Powermax I used. Obviously, if you plan on using the system on a CNC table, you’ll want to make sure your system comes with a machine torch and port to communicate with your CNC. Aside from that, you should consider the thickness of the material you plan to cut. Most experts recommend the 80/20 rule that calls for choosing a system with a recommended cut capacity that matches the material thickness you plan to cut 80 percent of the time. Also, consider the type of power you have available and the system’s duty cycle.
While not needed in the strictest sense of the word, there’s a fifth component I consider critical: a torch height control (THC). Some low-cost CNC plasma tables are sold without a THC to reduce the price, but I personally would never buy a system without one. It will dramatically improve cut quality along with torch and consumable life, saving you money in the long run. Finally, table manufacturers typically offer training and aftersales support. As you consider a machine purchase, make sure that the post-purchase service levels meet your requirements.
Plasma cutting systems can provide great performance at even better prices, but make sure they fit your needs before you get started to ensure you aren’t disappointed. Do that and you’ll be amazed by what you and your table can do.


