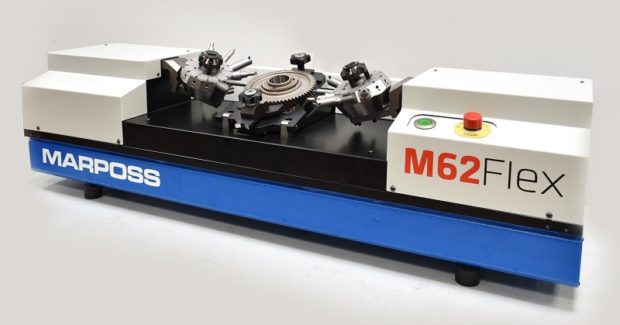
Measure Gears with Different Diameters Without Mechanical Retooling
For measuring flexibility on the shop floor, the M62 Flex manual bench gauge from Marposs uses a universal reference to locate each part and soft-touch engagement with the gear being measured to prevent any potential damage from contact.
Posted: March 25, 2019
The M62 Flex™ manual bench gauge system from Marposs Corporation (Auburn Hills, MI) provides the flexibility needed on the production floor to measure gears with different diameters without mechanical retooling. Utilizing a universal reference “Vee” on a 30 deg angle eliminates the need of using an ID centering post (or nosepiece) to locate each part for measuring, and it reduces set-up time. This gauge employs servo-driven actuators and is the first smart gauge that integrates “soft-touch” technology when engaging with the gear being measured. Soft-touch technology addresses the age-old issue of green parts and master parts being potentially damaged by the measuring contacts. The M62 soft-touch technology employs a software routine where the measuring group is able to approach a gear surface in velocity mode with a controlled low force while the position error is monitored, resulting in better control of the process and avoiding damage.
The M62 Flex can inspect odd or even-toothed helical and spur gears with external diameters from 30 ÷ 180 mm, heights ranging from 15 ÷ 40 mm and modules from 1 to 4. It has mechanical turrets with capacity to locate up to 12 contacts each and is suited for inspecting DOB (MdK), major diameter and minor diameter.
Marposs also offers their Confocal non-contact measuring system that enables very fast, high resolution distance and thickness gauging of almost any surface, including solid, transparent, and polished mirror surfaces such as glass, plastic, or silicon wafers. This system is based on the confocal chromatic measuring principle where white light is split into different spectra using lenses focused on an object through a multi-lens optical system. The lenses are arranged to create and send a chromatically-aberrated beam to the target. The target reflects the optical beam back to the probe, where it transmits the reflected optical beam to a spectrometer. The reflected optical beam is comprised of rays coming from the outside surface of the object being measured and from the internal surfaces that the beam is able to reach. The reflected light intensity is at a maximum for the wavelengths focused on the surfaces. Electronic processing can then determine the intra-layer thickness values of the target, or the distance from the probe to the outside surface and to the intra-layer surfaces of the target.
The Confocal measuring system features a 4 mm optical sensor within the measuring probe, the accuracy is extremely precise, enabling the identification of very small aberrations in shape, air gap, or paint finish. The measuring probe placement can be adjusted to achieve very high accuracy. For example, a measuring range of 0.4 mm provides 0.055 µm accuracy, whereas a measuring range of 12 mm provides about 0.750 µm accuracy. Example applications include:
- Detection of metal burrs in cell phone holes.
- Measurement of air gaps between two pieces of glass being assembled into a windshield.
- Thickness measurement of transparent finishing paint on a glass surface.
- Diameter measurement of plastic insulin syringe fingers.
This system is offered with different sensor models and either a DIN rail controller for combination with a PC or a stand-alone unit with an integrated 7 in display screen.
Marposs Corporation, 3300 Cross Creek Parkway, Auburn Hills, MI 48326, 248-370-0404, marposs@us.marposs.com, www.marposs.com.


