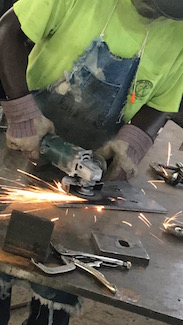
Best Practices For Avoiding a Burr in the Saddle
Deburring ensures parts fit perfectly during welding or final assembly. This leads to higher-quality products and more efficient workflows that will save your shop time and money – and improve its bottom line.
Posted: August 17, 2020
Burrs are generated in just about any and every metal-processing stage, beginning at the steel mill; moving to cutting, punching, drilling, forming, beveling, and welding; and ending at final assembly, installation, and/or erection. As a result, removing them is something virtually every shop must do.
Burrs can prevent components from coming together properly. They can also obstruct clearance tolerances, such as bolts not fitting through holes. They can lead to loose metal shards in a weld zone that could result in bad welds. They can interfere with measuring devices, such as tape measures, causing them to begin measuring at the wrong starting point and give an inaccurate measurement. Visually, they give the impression of poor quality even if quality is high.
For these and other reasons, the importance of deburring cannot be understated.
Deburring removes shards of sharp metal to avoid cuts and injuries for anyone touching or handling the metal. Additionally, deburring helps to maintain the safety of a shop’s other machines. Materials must be deburred before proceeding to the next stage in manufacturing. If this doesn’t occur, the sharp edges could get caught on a variety of parts in the other machines during the manufacturing process.
If done properly, deburring should eliminate all of these issues.
Deburring Methods: Manual, Machine, and Robotic
Deburring methods range from expensive robotic systems for mass-produced small parts to computer numerical control (CNC) equipment for specialized or general machined parts like bolts to hand-held bevellers and grinders. The method (or methods) depends on the type of service or product a shop provides.
Deburring systems are typically customized procedures based on a shop’s products and capabilities. They’re designed to provide the most efficient method required for a shop’s specialty. Therefore, while many procedures are similar from shop to shop and industry to industry, there’s always some customization specific to a shop’s core service or product.
For example, a high-volume parts manufacturer may rely on CNC or robotic equipment to handle repeating small parts. On the other hand, a customized fabrication shop like ours may use hand-held beveling machines and grinders for the flexibility they provide to maneuver in and around large, oddly shaped, and/or difficult-to-access parts and fabrications.
The Proper Training
Training varies based on the tools and equipment a shop uses. An employee may need months of training to learn how to program and operate complex robotic and CNC equipment, as well as how to recognize when machine parts are wearing out and need replacing.
On the other hand, most employees become very efficient at using hand-held bevellers and grinders after a few weeks of hands-on experience. The basics of deburring systems are generally taught at trade schools; however, workers typically get a better understanding of them from working on the job.
Best Deburring Practices
Best practices revolve around three main components: safety, practicality, and efficiency. Safety is always the foundation of any system or process. Once the safety aspect is considered, one must choose a few deburring methods that are practical for deburring that type of product. Then, the most efficient and practical method to finalize the system must be selected.
Like all equipment, it’s essential to follow the manufacturer’s maintenance guidelines to ensure peak performance. Without proper maintenance, motors can quit, power chords may break, and beveller teeth and grinding wheels could wear down.
It’s also a good idea to audit a deburring system annually, particularly if your shop’s products and services have evolved. As years go by, a shop may enter new markets with a new customer base and new products that may require new technology and equipment to stay current on what is safest, most practical, and most efficient. An annual audit helps avoid falling behind or losing productivity based on using outdated technology or equipment.
Disposing of Burrs
Because they’re burned pieces of metal thrown off as sparks and dust that can’t be captured and disposed of, most burrs are incredibly small. In these cases, many shops have hoods and dust collection systems to remove the particles from the working environment. Large burrs are typically collected by the machine itself, and can be discarded once it’s full. Also, once deburring is completed in the designated area, a traditional broom sweep and manual collection of fragments is the method traditionally used.
Regardless of collection method, fragments that are large enough can be sold as scrap metal – a potential source of additional revenue.
Burrs are unavoidable in the fabrication process, but they must be removed for the safety of the worker and the quality of the project. From CNC equipment to handheld bevellers and grinders, choose a deburring method or methods based on the service and/or product type your shop provides.
On-the-job training is typically the best way for workers to learn how to use a deburring machine, with more complex systems taking longer to learn. During training, employees will learn how to use their shop’s equipment and systems safely and efficiently.
The proper deburring equipment ensures parts fit perfectly during welding or final assembly. This leads to higher-quality products and more efficient workflows that will save your shop time and money – and improve its bottom line.


